Database Manager Window
The Database Manager window consists of the following components:
This menu contains the following functions:
New
Opens the New database dialog box, in which you can specify a name for the new database. The current database is closed. The new database is created and opened.
Open
Opens the Open database dialog box, in which you can select a database to open.
Save
Saves all changes to the current database.
Save As
Opens the Save database as dialog box, in which you can specify a directory and the database type for saving the current database or creating a new database. If you create a new database, a copy of the current database is saved in the selected directory. The copy is opened as the current database.
Database Management
Opens the Database info for: db dialog box, in which you can specify information about the database and start database utilities for optimizing, converting, repairing and checking the database.
Delete database
Opens the Delete database dialog box, in which you can select a database to delete.
Exit INCA
Exits INCA.
If you have changed settings in open INCA windows, a message box appears. You can specify whether you want to save or discard your changes.
Menu functions depend on the dialog boxes. Not all dialog boxes contain all menu functions.
Add
Contains menu functions for adding database objects and folders in the current directory:
Add top folder | Creates a new top-level directory in the Database Objects list box. |
Add folder | Creates a new folder in the current directory in the Database Objects list box. |
Workspace | Creates a new workspace in the current directory. |
Experiment | Creates a new experiment in the current directory. |
ECU-Project (A2L) | Opens a dialog box in which you can select a description file for a new project. |
CDM-Configuration | Defines a new CDM configuration in the current directory. |
Cal Scenario-Configuration | Creates a new calculation scenario configuration in the current directory. |
CAN DBC | Opens a dialog box in which you can select a CAN DBC file (*.dbc). |
Measure-Catalog | Opens a dialog box in which you can select a file containing a measurement variables catalogue. |
ECU Documentation | Opens a dialog box in which you can select ECU documentation. |
AUTOSAR | Opens a dialog box in which you can select an AUTOSAR system template file (*.arxml). The original system template will be added to the Database Objects list of the INCA database. All CAN and CAN FD bus descriptions included in the AUTOSAR file will be listed separately under the AUTOSAR entry. |
J1939-DBC | Opens a dialog box in which you can select a J1939 description file (*.dbc). |
FIBEX | Opens a dialog box in which you can select a FIBEX file. This menu function object is available only if the INCA-FlexRay add-on is installed. |
LDF | Opens a dialog box in which you can select an LDF file as a description of the LIN bus. This menu function object is available only if the INCA-LIN add-on is installed. |
VXConfig | Opens the VX configuration. |
| Key Variable List | Opens a dialog box in which you can select a key variable list. For more information, see INCA supports a key variable list that contains all signals to be recorded. It allows to select signals by ASAP2 function / group, including the ranking order and raster. It works together with a INCA project (ASAP2 file), is exportable and editable by the user.. |
CAN Message List | Generates a new, blank CAN message list. |
Read CAN Message Log File | Generates a CAN message list based on a CANalyzer log file. |
These menu functions provide direct access to any enterprise calibration data management system from within INCA.
These menu functions are only available if the eCDM add-on is installed.
Connect to Enterprise CDM Adapter | Establishes a connection to the Enterprise CDM system. To be able to access your Enterprise CDM system via the INCA interface, you need to install a plug-in for the corresponding tool. Please check with your tool provider for the support of the INCA interface. |
Get ECU Projects | INCA loads a project description file (*.a2l), a HEX file (optional), and a CDF V2.0 file for quality meta data (optional) from the Enterprise CDM system. INCA adds the project as a new project and creates datasets from the HEX and CDF V2.0 files. |
Send ECU Project | INCA transmits the current project description file (*.a2l), HEX files and/or data exchange files from INCA into the Enterprise CDM system. If the original A2L file was changed in the ASAM-MCD-2MC editor, then INCA transmits the internally created updated A2L file. If INCA uses a data exchange file as dataset, this function is not available. |
Get Datasets | INCA loads HEX files (and optionally CDF V2.0 files for quality meta data) from the Enterprise CDM system and adds them as new datasets. The files must match the selected project. |
Send Datasets | INCA transmits the selected HEX files from INCA to the Enterprise CDM system. |
Update from Data Exchange File | INCA loads one or more data exchange files from the Enterprise CDM system and copies the contents over the selected dataset. The name of the related A2L file is sent to the Enterprise CDM system as reference. |
Get Data Exchange File | INCA loads data exchange files (CDF V2.0) from the Enterprise CDM system. The files must match the selected project. |
Send Data Exchange File | INCA transmits the selected data exchange files from INCA to the Enterprise CDM system. |
About | Provides information on the plug-in which is installed for connecting your Enterprise CDM system to INCA (class name, DLL name). |
Merge
Merges contents of another ASAP2 file (*.a2l) into the selected project which was created with a different ASAP2 file.
Measurement and calibration variables that are
part of the new ASAP2 file are copied into the existing project.
Thereby, functions, groups, frames, measurement and calibration variables,
axis points, computation methods and record layouts that already exist
in the project get overwritten. New measurement and calibration variables,
axis points, computation methods and record layouts get appended.
If the ASAP2 version of the new file is higher than that of the original one which was used to create the project, INCA uses the ASAP2 version of the new ASAP2 file.
Before merging INCA checks whether the following items match in the old and the new A2L file; if one of these checks fails, INCA rejects the new A2L file.
MOD_PAR check
- Memory Segment: address and size of all memory segments
- EPK: EPK string and EPK address
- ECU_CALIBRATION_OFFSET
MOD_COMMON check
- All alignments
- BYTE_ORDER
- DEPOSIT
Note |
|---|
INCA does not check the addresses of the measurement and calibration objects. INCA does not ensure that a characteristic is defined only once within functions. Merging ASAP2 files into one file may lead to incorrect result files and thus to unexpected behavior. Always check the ASAP2 files prior to merging them. Always check the merged result file thoroughly before using it. To enable the Merge functionality,
the corresponding option must be activated in the INCA ini file. If you
need this functionality, you must insert the following entry into the
INCA.ini or UserDef.ini
file within the [General] section: |
Replace
Replaces the ASAP2 or CAN-DB file that is assigned to the selected database object (ECU project, measurement catalog or CAN-DB) with a new file.
In case of replacing an A2L file, INCA does the following checks before replacing the file; if one of these fails, INCA rejects the new A2L file.
MOD_PAR check
- Memory Segment: address and size of all memory segments
- EPK: EPK string and EPK address
- ECU_CALIBRATION_OFFSET
Note |
|---|
INCA does not check the addresses of the measurement and calibration objects. Replacing ASAP2 files may lead to unexpected behavior. Always check the ASAP2 files prior to replacing them. Always check the replaced result file thoroughly before using it. |
Reparse
Reparses marked AUTOSAR file  . The
. The  indicates that the data is not yet reparsed with the current converter.
Delete
Removes marked database objects.
Cut
Moves the marked database objects to the clipboard. The objects are not deleted until they are pasted from the clipboard to another directory.
Copy
Copies the marked database objects to the clipboard.
Paste
Inserts the database objects in the clipboard in the current directory.
Rename
Renames the marked database object.
Edit
Opens a window for editing the marked database object. The window depends on the type of database object.
Import
Opens the dialog box Input Options, in which you can define the settings for importing and select a file for importing.
Export
Opens the Export Options dialog box, in which you can define settings for exporting and carry out exporting. The marked database objects are exported to files with the file name extension *.exp64 or *.exp.
Write
Contains menu functions for saving database objects to files:
A2L | Writes the marked project to an ASAM-2MC file. |
AUTOSAR | Writes the original AUTOSAR file that is marked in the database objects list to a file. |
FIBEX | Writes the marked FIBEX database object to a file. |
LDF | Writes the marked LDF database object to a file. |
FIBEX files can be written only if the INCA-FLEXRAY add-on is installed.
LDF files can be written only if the INCA-LIN add-on is installed.
Read only
Makes the marked database object read-only to prevent unintentional modifications.
You can remove the write-protection by selecting the object that was set to read-only and then selecting this option once again.
This option is only available for experiments, CDM configurations, and calibration scenario configurations.
Edit default status history settings
This menu function is available only if the add-on INCA-QM-BASIC has been installed together with INCA.
Opens the dialog box Define default status history settings, in which you can set the default values of the status history entries in the current project.
These entries are used only if you set the value Use project template for Template source in the user options.
Convert Experiment
Contains menu functions converting an experiment to be able to use the experiment with another project.
Apply mapping table using new definitions | Opens a dialog box, in which you can select a file containing a mapping table. A copy of the selected experiment is generated, and all variables and rasters are converted according to the mapping rules in the mapping file. |
Apply mapping table using old definitions | Opens a dialog box, in which you can select a file containing a mapping table. A copy of the selected experiment is generated, and all variables and rasters are converted according to the mapping rules in the mapping file. |
Create mapping table template | Opens a dialog box, in which you can create a file as template for the mapping file. The template is created on the basis of the A2L file. A template can only be written if a project is selected. |
Convert for INCA V5.x (only default recorder) | Creates a copy of the selected experiment which is compatible with INCA V5.x. The original settings used in the default recorder are adopted and reused in INCA V5.x for configuring the measurement recording. Additionally created recorders are not adopted. |
Convert for INCA V6.1 (only default recorder) | Creates a copy of the selected experiment which is compatible with INCA V6.1. The original settings used in the default recorder are adopted and reused in INCA V6.1 for configuring the measurement recording. Additionally created recorders are not adopted. |
Convert to INCA V7.0 (replace oscilloscopes) | Replaces the oscilloscopes contained in this experiment by measure tables so that the experiment can be used in previous INCA versions. The measure tables will have the same name as the original oscilloscope and will be replaced in the same layer as the original. This function is only available if you have selected an experiment supporting new oscilloscope types, which is represented by the following icon: |
Open experiment and update oscilloscopes | Converts the oscilloscopes contained in this experiments to oscilloscopes of the new type; the oscilloscope properties are kept. The converted experiment can only be used with INCA V7.1 and higher. When selecting this experiment, you will be prompted for indicating the workspace to be used, and the converted experiment will be opened. You must explicitly save the experiment to keep the converted experiment. A copy of the original version is added to the database. This function is only available if you have selected an experiment supporting old oscilloscope types, which is represented by the following icon: |


Menu functions depend on the dialog boxes. Not all dialog boxes contain all menu functions.
Show active workspace
Marks the active workspace in the Database objects list box.
Set selected workspace active
Sets the workspace marked in the Database objects list box to active.
Collapse all
Closes all directories in the Database objects list box.
Expand all
Opens all directories in the Database objects list box.
Filter
Contains menu functions for filtering the display of database objects:
<No filter> | Displays all database objects. |
Workspace | Displays workspaces only. |
Experiment | Displays experiments only. |
Project | Displays projects only. |
CDM Configuration | Displays CDM configurations only. |
Calibration Scenario Configuration | Displays calibration scenario configurations only. |
CAN DB | Displays CAN-DB description files only. |
Measure catalog | Displays measure data catalogs only. |
ECU Documentation | Displays ECU documentation only. |
AUTOSAR | Displays AUTOSAR system templates only. |
LDF | This database object is available only if the INCA-LIN add-on is installed. Displays only LDF files to describe the LIN bus. |
CAN Message List | Displays CAN message lists only. |
Fibex | This database object is available only if the INCA-FLEXRAY add-on is installed. Displays FIBEX description files only. |
Update
Updates the display of the database manager.
This menu contains the following functions:
User options
Contains menu functions for managing user option settings.
Open | Opens the User options dialog box, in which you can define settings for work with INCA. |
Export | Opens a dialog box where you can specify the path and name of the export file. The export file consists of a zip archive containing the exported INCA and CDM settings of the current user. |
Import | Opens a dialog box in which you can select a zip file for the import of INCA and CDM settings. The imported settings will overwrite the settings of the current user. Changed CDM settings only apply to new configurations; existing configurations remain unchanged. |
Station options
Opens the Station options dialog box, in which you can define settings to apply to all users.
User
Contains menu functions for managing user profiles:
Add | Opens a dialog box in which you can specify a name for a new user profile. |
Delete | Opens a dialog box in which you can select a user profile to delete. |
Change | Opens a dialog box in which you can select a user profile. |
This menu contains the following functions:
Switch Language
Switches the language of the INCA and INCA add-ons user interface after you restart the software.
ETAS Network Settings
Opens the ETAS Network Manager to assist you in configuring the network environment for ETAS hardware.
ETAS License Manager
Opens the ETAS License Manager to manage your ETAS software licenses.
Clean Up Deprecated Files
Deletes obsolete temporary files (*.temp) and log files (*.log):, see Cleaning Up Deprecated Files.
ASAM-2MC Editor
Opens the ASAM-2MC Editor to analyze and edit the items of existing A2L projects.
ASAM-2MC - Subset Generator
Opens the ASAM-2MC - Subset Generator to generate and modify A2L files.
ASAM-3MC - Open ASAM 3MC Interface
Opens the ASAM-3MC - Open ASAM 3MC Interface to use for communication between testbeds and INCA.
Calibration Data Manager
Opens the Calibration Data Manager to administer and analyze datasets generated in test series. You can use datasets managed in INCA as well as data exchange files in the formats CVX, DCM, CDF, and PaCo.
EATB - ETAS Analytics Toolbox
Opens the ETAS Analytics Toolbox to display and analyze measure data.
MDA - Measure Data Analyzer
Opens the Measure Data Analyzer (MDA) to display and analyze measure data files created in INCA.
Measure Data Converter
Opens the Measure Data Converter to convert measure files in different formats, for example ASCII, MATLAB (M-File), and Famos (*.imc).
UI Developer
Opens the User Interface Developer (VUI) to arrange any display and calibration elements in a window based on ergonomic considerations. Additional design elements such as labels, lines, rectangles, and split bars assist in dividing the surface into function areas. These screen layouts can be integrated in the Experiment Environment of INCA.
Note |
|---|
Some of the INCA utilities need additional software licenses. |
Note |
|---|
Menu functions depend on the dialog boxes. Not all dialog boxes contain all menu functions. |
View
Contains menu functions for displaying items:
Collapse all | Closes all directories in the Datasets list box. |
Expand all | Opens all directories in the Datasets list box. |
Add Top Folder
Creates a new top-level directory in the Datasets list box.
Add Folder
Creates a new folder in the current directory in the Datasets list box.
Read HEX File (Data Exchange File)
Opens a dialog box in which you can select a HEX file or a data exchange file. The dataset that was being read is created as a new working dataset in the current directory of the Datasets list box.
If you have selected a data exchange
file for importing, INCA creates a blank HEX file and copies the contents
from the data exchange file into the newly created blank dataset. Datasets
created from a data exchange file are displayed with the following icon:

Create Empty Dataset
INCA generates an empty dataset, creates the memory segments described in the A2L file, and inserts variables described in the A2L with fill bytes as values.
Check
Contains menu functions for different checks:
Dataset | Starts dataset checks of selected datasets. |
Bounds | Starts bounds checks of selected datasets. You can set in the user options under Data Exchange - Bounds Check which types of bounds shall be checked and which will be ignored. For further information, see User Options for Bounds Checks and Making Bounds Checks for Datasets. |
Overlap | Starts overlap checks of selected datasets. |
Rerun all checks | Starts dataset checks, bounds checks, and overlap checks together. |
A list of variables with violations, including a comment on the violation, is written to a LAB file, which you can open from a dialog after the check.
In front of the dataset name, a status icon is displayed. The status refers to the dataset check, the bounds check, and the overlap check. is displayed if all checks are ok.
 is displayed if the checks detected an error. Details on the error are given in the tooltip.
No status icon means that neither dataset check nor bounds check nor overlap check was executed.
If you want to execute checks automatically, see User Options: General Tab.
Enterprise CDM
These menu functions provide direct access to any enterprise calibration data management system from within INCA.
These menu functions are only available if the eCDM add-on is installed.
Connect to Enterprise CDM Adapter | Establishes a connection to the Enterprise CDM system. To be able to access your Enterprise CDM system via the INCA interface, you need to install a plug-in for the corresponding tool. Please check with your tool provider for the support of the INCA interface. |
Get ECU Projects | INCA loads a project description file (*.a2l), a HEX file (optional), and a CDF V2.0 file for quality meta data (optional) from the Enterprise CDM system. INCA adds the project as a new project and creates datasets from the HEX and CDF V2.0 files. |
Send ECU Project | INCA transmits the current project description file (*.a2l), HEX files and/or data exchange files from INCA into the Enterprise CDM system. If the original A2L file was changed in the ASAM-MCD-2MC editor, then INCA transmits the internally created updated A2L file. If INCA uses a data exchange file as dataset, this function is not available. |
Get Datasets | INCA loads HEX files (and optionally CDF V2.0 files for quality meta data) from the Enterprise CDM system and adds them as new datasets. The files must match the selected project. |
Send Datasets | INCA transmits the selected HEX files from INCA to the Enterprise CDM system. |
Update from Data Exchange File | INCA loads one or more data exchange files from the Enterprise CDM system and copies the contents over the selected dataset. The name of the related A2L file is sent to the Enterprise CDM system as reference. |
Get Data Exchange File | INCA loads data exchange files (CDF V2.0) from the Enterprise CDM system. The files must match the selected project. |
Send Data Exchange File | INCA transmits the selected data exchange files from INCA to the Enterprise CDM system. |
About | Provides information on the plug-in which is installed for connecting your Enterprise CDM system to INCA (class name, DLL name). |
Fill Undefined Ranges with Fill Byte
Opens a dialog box in which you can define an individual fill byte for a selected dataset. The fill byte is written to the dataset and displayed in the Database Manager.
Delete
Removes the elements marked in the Datasets list box.
Cut
Moves the elements marked in the Datasets list box to the clipboard. The objects are not deleted immediately: they are deleted when they are pasted from the clipboard to another directory.
Copy
Copies the elements marked in the Datasets list box to the clipboard.
Paste
Inserts the elements in the clipboard into the current directory of the Datasets list box.
Rename
Renames the marked item.
Set Read Only
Makes the marked dataset read-only.
It is not possible to remove the write-protection from a dataset once it has been set.
Import Dataset
Opens a dialog box in which you can select a dataset for importing.
Export Dataset
Opens a dialog box in which you can specify a file for exporting the marked datasets. The marked database objects are exported to files with the file name extension *.exp64 or *.exp.
Create HEX File
Opens a dialog box in which you can specify a file for saving the marked dataset.
Calibration Log
Note |
|---|
You cannot use this function if you are using INCA with the INCA-EIP add-on. |
Contains menu functions for writing and deleting entries in the value history of the selected dataset.
Write | Writes changes in the dataset to the value history of the dataset. |
Delete | Deletes all entries from the value history of the selected dataset. |
Calibration Data Manager
Starts the Calibration Data Manager. The marked dataset is used as the source dataset. If more than one dataset is marked, the first dataset is used as source dataset and the other datasets as destination datasets.
Display Calibration History
Opens the Status history for dataset window in which you can show and edit the status history of the current dataset.
This menu function is available only if the add-on INCA-QM-BASIC has been installed together with INCA.
This menu contains the following functions:
Hotkey Assignment
Opens the Hotkey assignment for dialog box, in which you can view the INCA hotkey assignment.
Help on Current Window
Opens the help for the current window (F1).
Help
Opens the help for INCA.
Manuals and Tutorials
Opens the directory containing the INCA manuals.
Video Tutorials
Opens an overview listing all video tutorials for INCA. You can access the videos directly from the overview. ETAS continously creates further video tutorials, which can be downloaded from the ETAS website.
About
Opens an information box about INCA.
Support
Shows phone numbers and mail addresses of the INCA hotline support.
Product Disclaimer
Displays the warning notice about using INCA.
Loaded packages
Opens the Monitor window and lists the loaded INCA modules with their version numbers.
Contains the following menu functions:
Zip | Opens a dialog box in which you can enter a problem description and pack it together with or without project files in a ZIP archive. |
Send | Sends the ZIP archive to ETAS. |
View | Opens the INCA log directory in the Windows Explorer. |
Extended Logging | If you encounter a specific problem and need help from ETAS for troubleshooting, exact log files might be required for reproducing and analyzing the situation properly. However, extended logging is disabled by default, because it might slow down system performance. This option opens a dialog which provides further information on how to enable extended logging for better cause analysis in case of problems. |
This window can contain the following components, depending on the database objects selected:
This menu contains the following functions:
Run experiment
Opens the experiment of the current workspace in the experiment environment.
Change
Opens the Select experiment environment dialog box, in which you can define an experiment for the current workspace.
Remove experiment
Removes the experiment from the current workspace.
Only the reference to the experiment is removed. The experiment remains in the INCA database and can be reused.
Experiment without full HW access
Defines whether hardware will be fully initialized the next time you open the experiment. The current setting can be changed by clicking this menu option:
- If a tick is displayed before the menu option, the experiment will be opened without fully initializing the hardware. Full measuring and online calibration capability is available only if you explicitly initialize the hardware (F3).
- If there is no tick before the entry, full hardware initialization will be executed before opening the experiment.
This menu contains the following functions:
 Add Project/Dataset
Opens the Select project and working data for device dialog box, in which you can select a project and a working dataset or create new ones.
The new project and the working dataset are added to the Project/device list box of the workspace.
 Change Project/Dataset
Opens the Select project and working data for device dialog box, in which you can select a project and a working dataset or create new ones.
The selection replaces the previous project and the previous working dataset of the marked entry in the Project/device list box of the workspace.
 Remove Project/Dataset
Removes the marked entry in the Project/device list box of the workspace.
Only the reference to the items is removed. The project and the working dataset remain in the INCA database.
![]() Navigate to Project
Navigate to Project
Navigates from a device to the assigned project in the Project view of the Database Manager.
This menu contains the following functions:
Configure hardware
Opens the hardware configuration editor, in which you can configure the hardware for the current workspace.
<new device>
Opens the Add new device for project dialog box, in which you can select a device.
The selection replaces the previous device of the marked entry in the Project/device list of the workspace.
<search for hardware>
Searches for connected devices.
You can add found devices to the current hardware configuration.
Group device
The device marked in the Project/device field is added to or removed from the control device group.
This menu contains the following functions:
Show view hierarchy
Displays the variables of the experiment in the Experiment Elements list box, grouped by layers and display windows.
Show elements flat
Displays the variables of the experiment in the Experiment Elements list box, not grouped.
Show measure and calibration view
Displays the variables of the experiment in the Experiment Elements list box, grouped by measurement values and variables.
Cut
Places marked items on the clipboard. The items are not removed until they are pasted from the clipboard to another experiment.
Copy
Copies marked items to the clipboard.
Paste
Pastes items from the clipboard to the current experiment.
Delete
Deletes marked items from the experiment.
Rename
Renames the marked item.
Copies element names to the clipboard.
Import
Opens a dialog box in which you can select a file to import.
Export
Opens a dialog box in which you can perform an export action. The items are exported to a file with the file extension * .exp64.
Collapse all
Closes all groups in the Experiment Elements list box and displays the layers.
Expand up to windows
Displays the windows in the Experiment Elements list box.
Expand all
Opens all groups in the Experiment Elements list box and displays the variables.
Sorted view
Displays the sequence of layers in alphabetical order.
Ordered view
Displays the sequence of layers as used in the experiment.
Move layer up
Moves a highlighted item one place up; the icon
 must be inactivated.
Move layer down
Moves a highlighted item one place down; the
icon must be inactivated.
This menu contains the following functions:
Change source project and dataset
Opens the Select source project and dataset dialog box in which you can select a dataset from an INCA project as the source dataset.
Change source file
Opens a file selection dialog box in which you can select a data exchange file (in CVX, DCM, PaCo and CDF V2.0 format) as the source dataset.0
Remove
Deletes the source dataset.
This menu contains the following functions:
Add project/dataset
Opens the Select destination project and dataset dialog box in which you can select a dataset from an INCA project as the destination dataset.
Add File
Opens a file selection dialog box in which you can select a data exchange file (in CVX, DCM, PaCo and CDF V2.0 format) as the destination dataset.0
Remove
Deletes the selected destination dataset.
This menu contains the following functions:
Add File
Opens a dialog for the file selection in which you can select a scenario file (formats CVX, DCM, CDF V2.0, and PaCo).
Remove
Deletes the selected scenario file.
The toolbar contains the following symbols:
| Opens the New database dialog box, in which you can specify a name for the new database. The current database is closed. The new database is created and opened. |
| Opens the Open database dialog box, in which you can select a database to open. |
| Opens a drop-down menu to add database objects |
| Saves all changes to the current database. |
| Moves the marked database objects to the clipboard. The objects are not deleted until they are pasted from the clipboard to another directory. |
| Copies the marked database objects to the clipboard. |
| Inserts the database objects in the clipboard in the current directory. |
| Removes marked database objects. |
| Opens the dialog box Input Options, in which you can define the settings for importing and select a file for importing. |
| Opens the Export Options dialog box, in which you can define settings for exporting and carry out exporting. |
| Opens the Dialog Box User options, in which you can define settings for work with INCA. |
| Defines whether hardware will be fully initialized the
next time you open the experiment. |
| Starts MDA (Measurement Data Analyzer). |
| Starts the Calibration Data Manager. |
| Starts the user interface editor for variable user interfaces. |
| Opens the INCA help. |


The toolbar contains the following symbols:
| Expands all directories in the Database Objects list box. |
| Collapses all directories in the Database Objects list box. |
| Allows filtering according to database objects. Next to this icon there is a search field to find objects in the database. | |
| Allows stepwise navigation through the Database Objects. | |
| Marks the active workspace in the Database Objects list box. |


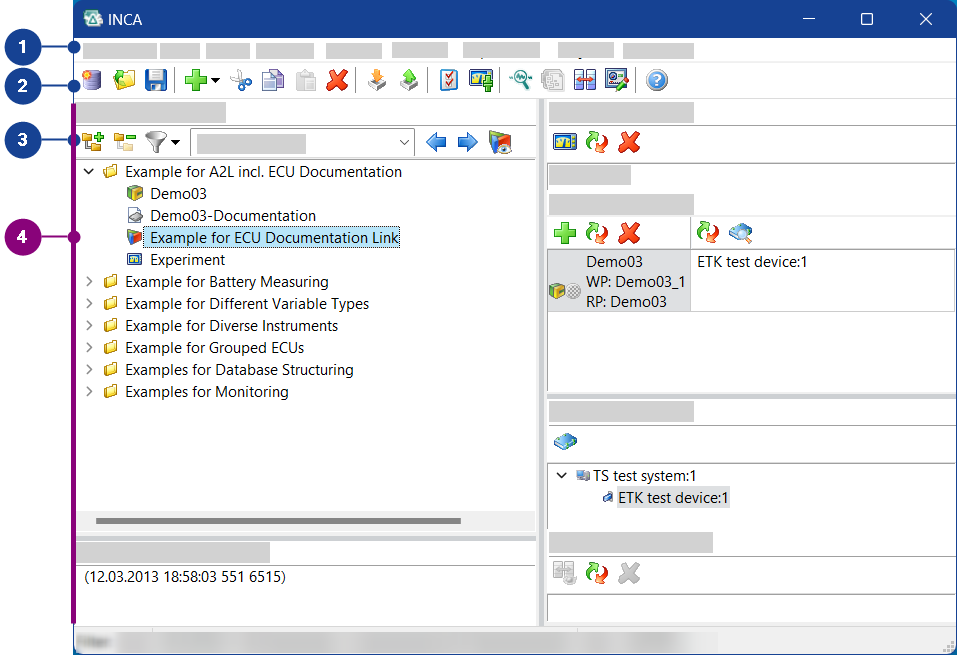
The main window contains a row of list boxes that provide an overview of the database objects contained in the database.
The list box Database Objects is unmodifiable and lists all database objects. They can be saved in any folder. The folder structure serves only to arrange the data more clearly but has no effect on functionality.
What further list boxes are displayed depends upon the type of database object (e.g. a work environment or project) you have selected in the list box Database Objects. The following provides an overview of which fields are displayed when you have selected a corresponding object (e.g. a work environment) in the list box Database Objects.
The Database Objects list box contains all database objects organized in a tree structure. As in the Windows Explorer, you can create your own folders to improve management of your database objects.
Icons for database objects
| Workspace |
| Experiment supporting new oscilloscope types |
| Experiment supporting old oscilloscope types |
| ECU project (with code part taken out of the first imported HEX file) |
| ECU project (without code part) |
Additional information may be provided by means of overlay icons which are placed on top of one of the above ECU project icons. The following overlay icons may be shown:
Furthermore, the following icon may be shown next to the project icon:
| |
| CDM configuration |
| Calibration Scenario Configuration |
| Measure catalog |
| ECU Documentation |
| AUTOSAR description in a AUTOSAR system template; all CAN bus descriptions (CAN clusters, represented by |
| FIBEX description |
| LIN description (LDF) |
| CAN DB description |
| CAN Message List |

 ECU project without information on memory segments; the memory layout may contain a mixture of both measurement and calibration variables without segmentation
 ECU project which is loaded from Enterprise CDM.
  the ECU project is corrupt and can not be used.


 ) that are included in the AUTOSAR file are listed separately under the AUTOSAR entry.
Workspace Comment
In this list box, you can enter any note on the selected item. The note will be saved in the database.
Experiment
The Experiment list box is activated if you mark a workspace in the Database Objects list box.
The following buttons are then provided:
| Start experiment |
| Change experiment |
| Remove experiment |
Project/Device
The Project/device list box is activated if you mark a workspace in the Database Objects list box.
The following buttons are then provided:
| Add project/dataset |
| Change project/dataset |
| Remove project/dataset |
| Change device |
| Find and automatically replace device |


In addition to the devices listed on the right, symbols which supply additional information on the device can be displayed:
| This control device is grouped with another device. |
| This control device is part of a control device group, but not connected to another device. |

If the same datasets are used in multiple workspaces, and in one of them they belong to a grouped devices and the other one they don't, INCA shows the grouped device info from the workspace that was last selected.
Hardware
The Hardware list box is activated when you mark a workspace in the Database Objects list box.
The following button is then provided:
| Start hardware configuration editor |

Experiment Comment
In this list box, you can enter any note on the selected item. The note will be saved in the database.
Experiment Elements
The list box Experiment Elements is enabled when you select an experiment in the Database Objects list box.
The variables of the experiment are displayed in groups according to layers and windows.
The following icons are then available:
The functionality of the toolbar of the Database Manager is also available.
Data exchange
| Opens a dialog box in which you can select a file to import. |
| Opens a dialog box in which you can export an item. The items are exported to a file with the file name extension .ee. |


Display (affects only the display in the Database Manager)
| Closes all groups in the Experiment Elements list box and displays the layers. |
| Displays the windows in the Experiment Elements list box. |
| Opens all groups in the Experiment Elements list box and displays the variables. |
| When the button is activated (the button appears pressed),
the sequence of layers is displayed in alphabetical order. |


Moving (also affects the sequence of layers in the experiment environment)
| Moves a highlighted item one place up; the icon |
| Moves a highlighted item one place down; the icon |


Project Comment
In this list box, you can enter any note on the selected item. The note will be saved in the database.
Datasets
The Datasets list box is activated if you select a project in the Database Objects list box.
The working and reference datasets of the project are displayed:
| Master dataset: read-only master dataset automatically generated by reading the first HEX file. The code part of this HEX file is stored in the selected project. |
| Reference dataset: read-only dataset that you can use as a reference dataset. |
| Working dataset: unprotected dataset that you can use as a working dataset. |
Additional information may be provided by means of overlay icons which are placed on top of one of the above dataset icons. The following overlay icons may be shown:
|
 Dataset which was automatically generated by importing
a data exchange file.
Dataset which was automatically generated by importing
a data exchange file.Further icons may be displayed next to the dataset icon (with or without overlay).
The following icons may be additionally shown if the user option Online Dataset Check and/or Online Bounds Check are activated. In this case, a check is made by reading the HEX file or by the import/export function to determine whether the datasets match the project description file used (*.a2l).
| The user options Online Dataset Check and/or Online Bounds Check are activated, and the checked dataset complies with the project description file and the defined bounds. |
| The check detected a violation. The type of violation is provided in the tooltip when hovering with the mouse over this icon. |
If none of these icons is shown, the dataset is not checked. | |
| Dataset contains fill bytes. A dataset may contain fill bytes in the following cases:
These gaps will be represented by fill bytes in the dataset. Datasets containing fill bytes are neither exported as a Hex file nor downloaded to the
ECU; other features such as slewing may be also limited if data represented by fill bytes are referenced. |
The following information on quality meta data is shown if the add-on INCA-QM-BASIC has been installed together with INCA:
| Dataset contains information on quality meta data. |
| Dataset does not contain information on quality meta data. |


ECU Documentation
The ECU Documentation list box appears if you mark a project in the Database Objects list box.
The documentation of the project is displayed.
The following icons are then available:
Icon | Function |
| Open ECU documentation |
| Change ECU documentation |
| Delete ECU documentation |
If the user option Online Dataset Check is activated for a project, a check is made to determine whether the ECU documentation matches the project description file used (*.a2l). The result of the check is displayed in the ECU Documentation list box:
| ECU documentation matches project description file. |
| ECU documentation does not match project description file. |

If INCA cannot make this check, no icon is displayed next to the documentation.
Dataset Comment
The Dataset Comment list box is activated if you select a project in the Database Objects list box.
This list box shows information about the selected database object, to which you can add your own comments.
CDM Configuration Comment
In this list box, you can enter any note on the selected item. The note will be saved in the database.
Source
The Source list box is activated when you select a CDM configuration in the Database Objects list box.
The following buttons are then provided:
| Select data exchange file as source dataset |
| Select dataset from INCA project as source dataset |
| Delete source dataset |


In addition to the dataset names listed in the list box, symbols which supply additional information on the dataset can be displayed:
| This dataset is a Master dataset. |
| This dataset is a read-only dataset. |
| This dataset is a working dataset. |
| The dataset was created from a data exchange file. |
| The data are saved in a data exchange file in one of the available data exchange formats. |
| The data exchange file is linked to a ASAP2 project (A2L file). |

Destination
The Destination list box is activated if you select a CDM configuration in the Database Objects list box.
The following buttons are then provided:
| Select data exchange file as destination dataset |
| Select dataset from INCA project as destination dataset |
| Delete destination dataset |
In addition to the datasets listed in the list box, symbols which supply additional information on the dataset can be displayed:
| This dataset is a Master dataset. |
| This dataset is a read-only dataset. |
| This dataset is a working dataset. |
| The dataset was created from a data exchange file. |
| The data are saved in a data exchange file in one of the available data exchange formats. |
| The data exchange file is linked to a ASAP2 project (A2L file). |
Source/Destination Comment
The Source/Destination Comment list box is activated if you select a CDM configuration in the Database Objects list box.
This list box shows information about the selected database object, to which you can add your own comments.
Cal Scenario Config Comment
In this list box, you can enter any note on the selected item. The note will be saved in the database.
Scenario
The list box Scenario gets activated when you select a calibration scenario configuration in the Database Objects list box.
It lists all files that belong to the selected calibration scenario configuration.
The following icons are available:
| Add scenario file to the configuration |
| remove scenario file from the configuration |
Cal Scenario Comment
The list box Cal Scenario Comment gets activated when you select a calibration scenario configuration in the Database Objects list box.
It displays information on the scenario file that is selected in the Scenario list box. You cannot edit this comment.
ECU Documentation Comment
In this list box, you can enter any note on the selected item. The note will be saved in the database.
ECU Documentation Files
The list box ECU Documentation Files gets activated when you select an ECU documentation in the Database Objects list box.
It lists all files that make up the selected ECU documentation.
The following icon is available:
| change the ECU documentation file |

ECU Documentation Info
The list box ECU Documentation Info gets activated when you select an ECU documentation in the Database Objects list box.
It displays information on the file that is selected the ECU Documentation Files list box, e.g. the EPROM-ID of the documentation or the path of documentation files and required utility files.
AUTOSAR System Template Comment
In this list box, you can enter any note on the selected item. The note will be saved in the database.
AUTOSAR System Template
The list box AUTOSAR System Template gets activated when you select an AUTOSAR system template in the Database Objects list box.
The list box displays information on the selected AUTOSAR system (original path of the file, file date, version and dll of the a2l converter, etc.). Warnings that occurred upon reading the file are also listed.
FlexRay Cluster Comment
In this list box, you can enter any note on the selected item. The note will be saved in the database.
Bus Description File Info
The list box Bus Description File Info gets activated when you select a FIBEX file in the Database Objects list box.
The list box displays information on the selected FIBEX file such as name and save date of the original file, the version of the converter, the FIBEX version and the Baudrate. Warnings that occurred upon reading the file are also listed.
LIN Cluster Comment
In this list box, you can enter any note on the selected item. The note will be saved in the database.
LDF
The list box LDF gets activated when you select an LDF File (LIN Description File) in the Database Objects list box.
It displays information on the selected LDF file such as name and save date of the original file, the version of the converter, the LIN version and the baudrate. Warnings that occurred upon reading the file are also listed.
CAN Message List Comment
In this list box, you can enter any note on the selected item. The note will be saved in the database.
Messages
The Messages list box is activated if you select a CAN message list in the Database Objects list box.
This list box displays the CAN messages and their defined properties that you can send to a CAN output device.
INCA supports a key variable list that contains all signals to be recorded. It allows to select signals by ASAP2 function / group, including the ranking order and raster. It works together with a INCA project (ASAP2 file), is exportable and editable by the user.
EXAMPLE
| [FUNCTION] | |
| Function_A | Raster_3 |
| [GROUP] | |
| Group_B | --- |
| [RAMCELL] | |
| Signal_I | Raster_2 |
| Signal_F | Raster_2 |
Raster in Functions and Groups
- The key variable list states one raster for a function. If the ASAP2 file defines no signal specific default raster INCA uses the key variable list raster for all signals of the function.
The key variable list states no raster for groups. If the ASAP2 file defines no signal specific default raster INCA uses internal algorithm to select rasters.
The database objects FIBEX and LDF are available only if you have installed the INCA-FLEXRAY and INCA-LIN add-ons.