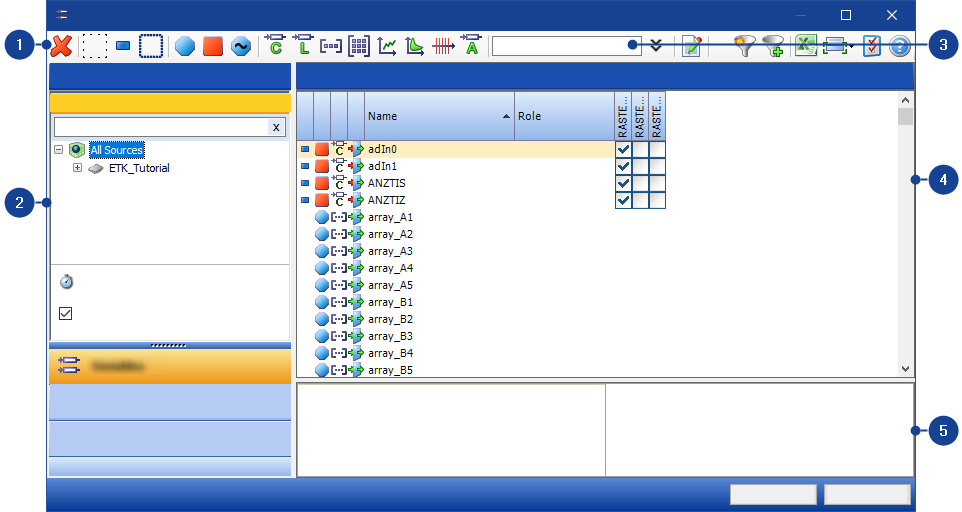
Variables Tab
The Variables tab allows adding variables to the experiment.
- Open the Variables tab by clicking on the Variablestab or pressing Ctrl + 1.
The Variables tab includes the following components:
Note |
|---|
The displayed icons in the toolbar can vary depending which filter groups you have activated, see Configuring the Representation of Variables View. |
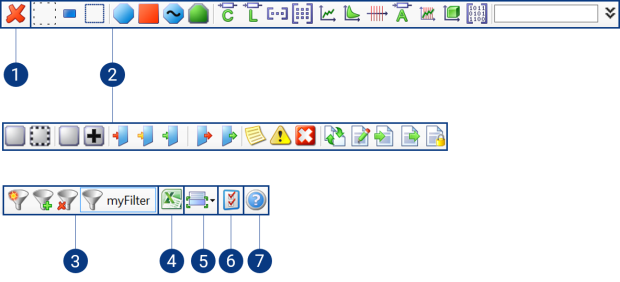
In the toolbar of the Variables tab, the following groups or functions are available:
- Delete Filters
- Variable, Function, and Group Filters
- Filter Configuration
- Excel Export
- Information Window
- Settings for Variable Selection
- Help for Variable Selection Dialog Box
Note |
You can insert additional filters in the toolbar through the context menu (see Configuring the Representation of Variables View). To save your set filters for other Variable Selection Dialog sessions, activate Keep filter settings for the next VSD sessions in the Keep filter setings for the next VSD sessions. |
1. Delete Filters
| Use this button to delete all selected filters. |

2. Variable, Function, and Group Filters
To filter the list of variables by variable type, the toolbar provides the following functions:
Selection Status
Filters in the Selection Status group filter the list of variables with respect to the selection status.
All variables neither added to an experiment nor selected in the current variable list are displayed. | |
 | All variables added to an experiment are displayed. |
 | All variables selected in the current variable list are displayed. |
Class
Filters in the Class group filter the list of variables with respect to the class to which the variables belong.
| Use this filter to view only the configuration variables. These variables can be changed. |
| Use this filter to view only the measured-value variables. These variables can be measured, but cannot be changed. |
| Use this filter to view only the variables of the adaptive parameters class. |
| Use this filter to view only the slewing variables. |


Type
Filters in the Type group filter the list of variables with respect to the variable types.
| Use this filter to view variables of type scalar. |
| Use this filter to view the variables of the type Boolean. |
| Use this filter to view variables of type vector. |
| Use this filter to view variables of type matrix. |
| Use this filter to view variables of type curve. |
| Use this filter to view variables of type map. |
| Use this filter to view the variables of the type Axis. |
| Use this filter to view variables of type ASCII. |
| Use this filter to view the variables of the type Curve Axis. |
| Use this filter to view the variables of type Multidimensional. |
| Use this filter to view the variables of type Blob (binary large object). |


Virtualness
Filters in the Virtualness group filter the list of variables with respect to real variables and virtual variables.
| Use this filter to view only non-virtual variables, i.e. these variables exist in the control unit and are not simulated by the system. |
| Use this filter to view only the virtual variables. Virtual variables are simulated by the system. |


Dependence
Filters in the Dependence group filter the list of variables with respect to variables that are dependent on other variables.
| Use this filter to view the variables whose value is not calculated from other variables. |
| Use this filter to view the variables whose value is calculated from other variables. |


Writability
Filters in the Writability group filter the list of variables with respect to the writability of variables.
| Use this filter to view the variables whose value cannot be changed. |
| Use this filter to view the variables whose value can only be changed in Offline mode. |
| Use this filter to view the variables whose value can be changed arbitrarily. |


Readability
Filters in the Readability group filter the list of variables with respect to the readability of variables.
| Use this filter to view the variables whose value cannot be read. |
| Use this filter to view the variables whose value can be read. |


Annotation Severity
Filters in the Annotation Severity group filter the list of variables with respect to variables containing notes.
| Use this filter to view the variables that include an application hint. |
| Use this filter to view the variables that include an indication of a possible problem. |
| Use this filter to view the variables that include an indication of possible malfunctioning. |


Role
Filters in the Role group filter the list of variables with respect to variables that have a certain task.
| Use this filter to view the variables that were imported from another function. |
| Use this filter to view the variables that were defined in and exported from the function you have selected. |
| Use this filter to view the variables that are input values of the function you have selected. |
| Use this filter to view the variables that are output values of the function you have selected. |
| Use this filter to view the variables that are local variables of the function you have selected. |


3. Filter Configuration
To manage the filter configurations, the toolbar provides the following functions:
 | Use this button to store defined filters in an XML file as filter configuration to be able to load it again in a different environment. | ||
 | Use this button to load a filter configuration stored in an XML file. | ||
 | Use this button to remove a filter configuration from the variable selection dialog.
| ||
| Use this button to enable or disable a loaded filter configuration. If the filter configuration is enabled, the background color of the button changes to yellow.
|


4. Excel Export
| Use this button to export the displayed variables together with the corresponding raster to an Excel file. |

5. Information Window
| Use the information window to show more detailed information on a variable you have just selected. The meta-information can be shown at the right side or bottom section of the variable pane. If this information is no longer required, it can be hidden again through the information window. |

6. Settings for Variable Selection
| Use this button to open the window in which you can set the defaults for variable selection. |

7. Help for Variable Selection Dialog Box
| Use this button to activate the help for the Variable Selection Dialog. |

Calling the source pane from the Experiment Environment
In the Experiment Environment, all devices added to the experiment in the Hardware Configuration Editor are listed in this pane. Depending on the corresponding device functions, groups, and rasters are shown additionally if necessary.
Calling the source pane from the Calibration Data Manager (CDM)
In the CDM environment, the functions of all devices added to the experiment in the Hardware Configuration Editor are listed in this pane.
Functions, groups, and rasters will be displayed if you click on the plus symbol in front of the device.
Likewise additional LAB-Files and filter configurations will be displayed.
Open Raster Preselection
Opens the Raster Preselectiondialog box. Use this dialog box to define a uniform raster for all variables of a device. This also applies to variables not displayed in the data list due to a set filter.
Note |
The A2L file indicates whether you can make a raster preselection or not. If you cannot make a raster preselection, the command Open Raster Preselection and the option Predefined raster will not be present in the Sources pane. |
Use Predefined Raster
Predefined raster are rasters which an A2L project optionally defines for a variable. If Use Predefined Raster is enabled, INCA uses the predefined rasters from the A2L file.
Use predefined raster
Allows you to precisely manage how the system handles raster assignments. If you select multiple variables, but not all of them can be mapped to the available rasters.
If the checkbox is activated, the system only uses the predefined rasters. Any variables that do not fit within these rasters will not be assigned to alternative rasters. This could result in incomplete variable mapping.
If the checkbox is deactivated, the system will first attempt to use the predefined rasters. If that's not possible, the system will look for alternative rasters that can accommodate all selected variables, potentially utilizing rasters that aren't predefined.
Predefined rasters are easily identifiable within the Variable Selection Dialog by their distinctive green double circle icon  .
.
Context Menu
To open the context menu, right-click in the Sources pane.
 Add LAB File
The Add LAB file function loads one or several LAB files. Functions and groups of LAB files can be used as a filter in the variable list. To activate this user option, select Experiment > Show Functions in variable list.
Note |
This command is only available at device level. |
 Remove LAB File
Removes the selected LAB files from the Source pane.
Reload LAB File
Reloads one or multiple LAB files. If you reload a LAB file that has been modified outside of INCA, e.g. in an external editor, these changes are immediately displayed and used in INCA after the reload.
Open Raster Preselection
Opens the Raster Preselection dialog box. Use this dialog box to define a uniform raster for all variables of a device. This also applies to variables not displayed in the data list due to a set filter.
Note |
This command is not available for calculated signals because this raster is calculated from the pre-defined rasters of the variables used. A LAB file contains a set of variables. These variables can be used for additional experiments. |
Expand All
Expands all collapsed elements.
Collapse All
Collapses all expanded elements.
Variable Search
With the Variable Search on the Variables tab, you can browse the list of variables for variables by entering the name of the variable or using the wildcard function. This type of search is an advantage if the exact name of the variable is unknown or if a number of variables with similar attributes are searched for.
Note
Searching for variables by using wildcard symbols (* for strings, ? for a single character) lists variables corresponding to the query.
Advanced Variable Find
To enable the Advanced Variable Search, click on
 .
.With the Advanced Variable Search, you can use search criteria, such as Name, Description, Element Type etc., to search for variables.
Add Criteria
With Add Criteria, you can add search criteria to the search window.
In this pane, the available variables are listed according to the sources selected and the filters used.
Following icons are indicating the selection status of the available variables in functions or groups:
 | All measurement variables are already selected. |
 | All measurement variables are selected in this Variable Selection Dialog session. |
 | Some measurement variables are already selected. |
 | Some measurement variables are selected in this Variable Selection Dialog session. |
In the Variables pane you can view meta-information on the listed variables and sort it accordingly.
To adjust the header of the Variables pane and to expand the list of variables by additional meta-information or attributes, see Configuring the Representation of Variables View.
If you have specified in the Options > Settings... menu of the Calibration Data Manager that the variables are to be sorted by functions, groups and functions are also displayed in the Variables pane.
Raster AllocationMeasurement variables can be allocated to one or more rasters. You can allocate rasters manually for single measure variables or in the predefined or preselected rasters for an entire device or a container.
Note |
You can only assign measurement variables to a raster. To allocate a variable to multiple rasters, the option Enable multiple rasters must be activated in the User Options |
 (see also
 The visualization of the raster options are as follows:
| Selected raster | Indicates that the user selected the measure variable in a raster. |
| Preselected Raster | Preselected rasters are rasters which the user can preselect in the Raster Preselection dialog box. You can only preselect the raster when the checkbox Use Predefined Rasters in the Source pane is disabled. |
| Indicates that the user selected the measure variable in a predifined raster. | |
| Predefined Raster | Predefined rasters are rasters which an A2L project optionally defines for a variable. Predefined rasters are used when the checkbox Use Predefined Rasters in the Source pane is enabled. |
| LAB file raster | Indicates that the raster is defined in the selected LAB file. |
| Partly selected raster | Valid only for special cases, for example, measurement arrays. Some measurement array elements are selected in this raster. To display a detailed raster selection of the measurement array, see Displaying the Raster of a Measurement Array. |
| Not selected | Indicates that the user did not select a measure variable in a raster. |


To open the context menu , right-click in the Variables pane.
This context menu contains the following functions:
Select
Selects the marked variable.
Note |
You can select variables without using the context menu. Just left-click on the variable. |
Select All
Selects all variables.
Deselect
Cancel the selection of a variable.
Adds the selected variable(s) to the corresponding environment.
Copy Variable(s)
Copies the names of selected variables to the clipboard for further use. The copied names can be used, for example, for the purpose of documentation in any (text) editor.
About variable
Opens the About Variable dialog box.
You will see detailed information about the variable and its use.
Display variable documentation
Note |
The control unit documentation is only displayed if the control unit manufacturer has provided this and if the corresponding control unit documentation has been added to the project in the database manager. |
Displays the control unit documentation for the variables marked in the list.
The information window contains detailed information on the raster and the variables.
Raster details
In this field the filling level in percent of the corresponding raster is shown. As soon as the maximum filling level of the raster is reached, no further variables can be added to this raster. The permissible filling level is defined in the A2L file of the device in question.
Variable details
The variable details of the marked variables are displayed in this box. Variable details are for example:
- Name
- Variable type (e.g. measured variable, calibration, etc.)
- Device affiliation
- Type (e.g. characteristic, map, etc.)
Note |
If more than one variable is selected from the pane, only the details from the last selected variable will be shown in the Information window. |