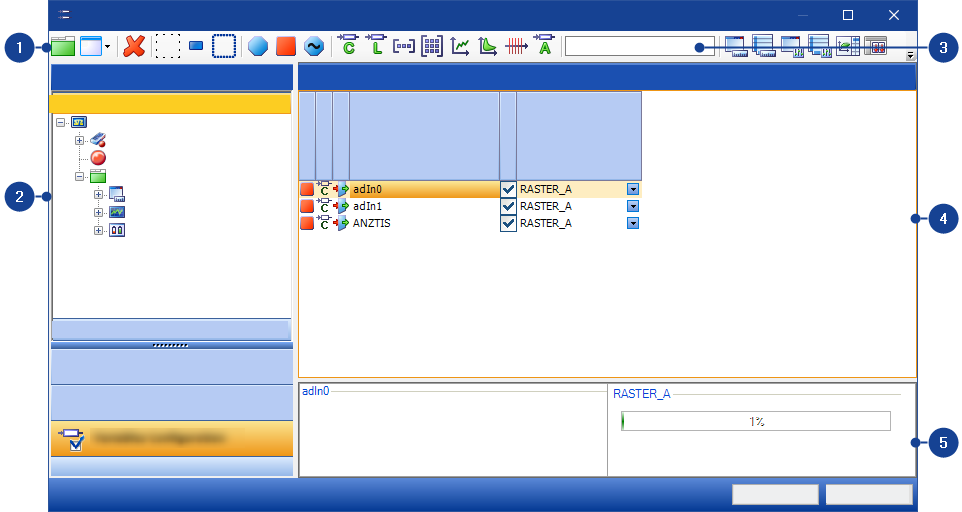
Configuration Tab
The Variables Configuration tab allows defining the recording status of variables.
- Open the Variables Configuration tab by clicking on Variables Configuration or pressing Ctrl + 3.
The Variables Configuration tab includes the following components:
Note |
|---|
The displayed icons in the toolbar can vary depending which filter groups you have activated, see Configuring the Toolbar. |
In the toolbar of the Variables Configuration tab, the following groups of functions are available:
- Add Elements
- Delete Filters
- Variable Filters
- Display Window Type
- Information window
- Settings for Variable Selection
- Help for variable selection dialog box
Note |
You can insert additional filters in the toolbar through the context menu, see Configuring the Representation of Variables View. To save your filter configuration, see Saving Filter Configurations. |
1. Add Elements
To add elements to the experiment, the following Functions are available:
| Adds a new layer to the experiment. |
| Opens a selection with which you can add new measure/calibration windows to the experiment. |


2. Delete Filters
| Use this button to delete all selected filters. |

3. Variable Filters
To filter the list of variables by variable type, the toolbar provides the following functions:
Selection Status
Filters in the Selection Status group filter the list of variables with respect to the selection status.
All variables neither added to an experiment nor selected in the current variable list are displayed. | |
 | All variables added to an experiment are displayed. |
 | All variables selected in the current variable list are displayed. |
Class
Filters in the Class group filter the list of variables with respect to the class to which the variables belong.
| Use this filter to view only the configuration variables. These variables can be changed. |
| Use this filter to view only the measured-value variables. These variables can be measured, but cannot be changed. |
| Use this filter to view only the variables of the adaptive parametersclass. |
| Use this filter to view only the slewing variables. |


Type
Filters in the Type group filter the list of variables with respect to the variable types.
| Use this filter to view variables of type scalar. |
| Use this filter to view the variables of the type Boolean. |
| Use this filter to view variables of type vector. |
| Use this filter to view variables of type matrix. |
| Use this filter to view variables of type curve. |
| Use this filter to view variables of type map. |
| Use this filter to view the variables of the type axis. |
| Use this filter to view variables of type ASCII |
| Use this filter to view the variables of the type curve axis. |
| Use this filter to view the variables of type multidimensional map. |
| Use this filter to view the variables of type Blob (binary large object). |


Virtual
Filters in the Virtual group filter the list of variables with respect to real variables and virtual variables.
| Use this filter to view only non-virtual variables, i.e. these variables exist in the control unit and are not simulated by the system. |
| Use this filter to view only the virtual variables. Virtual variables are simulated by the system. |


Inactive
The filter in the Inactive group filters the list of inactive variables shown grayed out and marked with the following overlay icon.
| Use this filter to view only inactive variables, see Variable Status in INCA. |

No-match
The filter in the no-match group filters the list of no-match variables shown grayed out and marked with the following overlay icon.
| Use this filter to view only no-match variables, see Variable Status in INCA. |

4. Display Window Type
To filter the experiment structure by measure/calibration windows, the toolbar provides the following filters of the Display Window Type group:
 | Use this filter to view Measure Windows. |
 | Use this filter to view Measure Tables. |
 | Use this filter to view Calibration Windows. |
 | Use this filter to view Scalar Table Editors. |
 | Use this filter to view Combined Editors. |
 | Use this filter to view Calibration Scenario Editors. |
 | Use this filter to view YT-Oscilloscopes. |
 | Use this filter to view XY-Oscilloscopes. |
 | Use this filter to view Delta Bar Charts. |
 | Use this filter to view Signal Distribution Charts. |
 | Use this filter to view Sortable Lists. |
 | Use this filter to view Absolute Value Bar Charts. |
5. Information window
| Use the information window to show more detailed information on a variable you have just selected. The meta-information can be shown at the right side or bottom section of the variable pane. If this information is no longer required, it can be hidden again through the information window. |

6. Settings for Variable Selection
| Use this button to open the window in which you can set the defaults for variable selection. |

7. Help for variable selection dialog box
| Use this button to activate the help for the Variable Selection Dialog. |

There are two different tabs in the Variables Configuration pane:
- Experiment: Displays your current experiment with all measure/calibration windows and variables.
- Sources: Display all ECU devices and their functions.
- Clicking on a function acts as a filter.
- Clicking on a raster displays all variables contained in a raster and in the experiment.
To open the context menu, right-click.
Add Layer
Adds a new layer to the experiment.
Add Widget
Adds a new measure or calibration window to the experiment.
Make Variables Active
Sets all variables of the layer to active.
Make Variables Inactive
Sets all variables of the layer to inactive.
Note |
In the experiment window, the icon |
Change Widget To
Changes the type of a measure or a calibration window.
Select All Instances
Selects all instances of an element.
Cut
Moves an element to the clipboard.
Copy
Creates a copy of an element on the clipboard.
Paste
Inserts an element from the clipboard.
Delete
Deletes an element.
Rename
Renames an element.
Create LAB File
Creates a LAB file for widgets of the same type. You can not create LAB files for single variables.
Expand All
Opens all tree levels below the selected layer and shows the subordinate windows and variables.
Collapse All
Closes all tree levels below the selected layer and shows only the layer.
Move Up
Moves an element in the experiment structure up by one step.
Move Down
Moves an element in the experiment structure down by one step.
Preselect <Variable Type>
It defines which variable type should be displayed in a measure/calibration window.
Reassign All to Predefined Rasters
Adapts the rasters in the current experiment to the rasters from a new A2L file. INCA checks and reassigns all measure variables to the new predefined raster. Useful for multi-core ECUs where rasters are defined for each core.
Variable Search
With the Variable Search in the tabs Display Configuration and Variables Configuration, you can search the experiment structure for variables in the Display Configuration or Variables Configuration tab by entering the name of the variable or using the wildcard function. This type of search is an advantage if the exact name of the variable is unknown or if a number of variables with similar attributes are searched for.
Note |
Searching for variables by using wildcard symbols (* for strings, ? for a single character) lists variables corresponding to the query. |
The recording status of variables and the raster can be defined in the Experiment pane.
The following information of the variables can be displayed:
Variables Icons
Displays the icons of the groups Class, Type and Writability/Readability.
Name
Displays the variables designations.
Active
Allows disabling or enabling a variable. If a variable is disabled, it is no longer displayed in the experiment environment, not recorded and not included in the raster check. If a variable is enabled again, it is displayed in the same measure/calibration window and with the same settings.
Note
You can also activate or inactivate all variables of a layer at once by right-clicking on the layer in the tree view and selecting Make variables active or Make variables inactive from the context menu. There are two different options to make variables inactive:
All will deactivate all variables at the layer at once.
Unique will only deactivate variables that are unique on this layer. Variables that are also used on other layers, won't be affected.If you are using an experiment with layers, you can easily see on the layer tab at the bottom of the Experiment window whether the layer contains inactive variables:
If the layer contains both active and inactive variables, then the icon is displayed next to the layer name.
If it contains only inactive variables, then the icon is displayed next to the layer name.
The tooltip of the layer tab provides additional information on the inactive variables.Record Only
Allows defining that a variable is recorded by the default recorder without being displayed in the experiment.
Note
If the variable is used in one or several measure/calibration windows, it is first identified by a red cross in the experiment structure of the Variable Selection dialog. If the dialog is closed with OK, the variable is removed from the measure/calibration windows. If Record Only is disabled again, the variables are displayed in a new measure/calibration window.
Raster
Allows defining the raster of a variable.
=?
Indicates whether the raster defined for the variable corresponds to the raster preselection.
Predefined Raster
Displays predefined rasters. Predefined rasters are rasters which an A2L project optionally defines for a variable.
Default Recorder
Allows defining that the variable is recorded with the default recorder. As such, it is also possible to record calibration variables.
Note
If additional recorder besides the default recorder are used in the experiment, they can also be displayed.
The information window contains detailed information on the raster and the variables.
Raster details
In this field, the filling level in percent of the corresponding raster is shown. As soon as the maximum filling Level of the raster is reached, you cannot assign any more variables to this raster. The permissible filling level is defined in the A2L file of the device in question.
Variable details
The variable details of the marked variables are displayed in this box. Variable details are for example:
- Name
- Variable type (e.g. measured variable, calibration, etc.)
- Device affiliation
- Type (e.g. curve, map, etc.)
Note |
If more than one variable is selected from the pane, only the details from the last selected variable will be shown in the Information window. |
See also