Solution: Fix the network configuration
Apparently, there is a problem in the network configuration for your ETAS network, or a problem with the network card.
To solve the problem:
Check the information provided by the IP Manager in the Windows taskbar, or for Windows 11 in the Hardware Configuration Editor toolbar:
Place the mouse over the IP Manager icon and check the information provided in the tooltip.
Note
If you are using the same network card for both your company network and the ETAS network, it has to switch from DHCP to APIPA, e.g. when you open an experiment or search for hardware. The Windows operating system may need up to 2 minutes for this switching process; in this period, the ETAS network is not available.
To get more information, right-click on the IP Manager icon and select Ethernet System Configuration from the context menu.
A dialog opens. The field 'System or Master view' displays a tree view of all Ethernet hardware systems that were found by the IP Manager.
The icons in front of the system name show whether communication is possible or not.
If a system is preceded by the icon
 , the system can be found, but communication is not possible, e.g. because the IP address of that system is located outside of the IP address range for ETAS hardware.
If the list is empty, the IP Manager could not find any Ethernet measurement and calibration hardware.
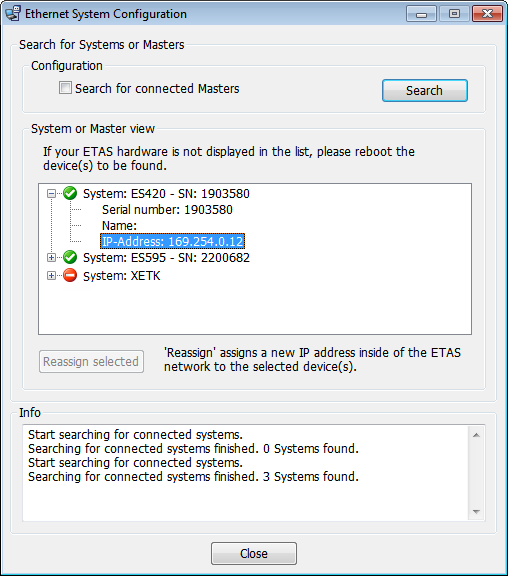
If the given information does not help immediately in solving the problem, go on with the next steps.
Check your network configuration:
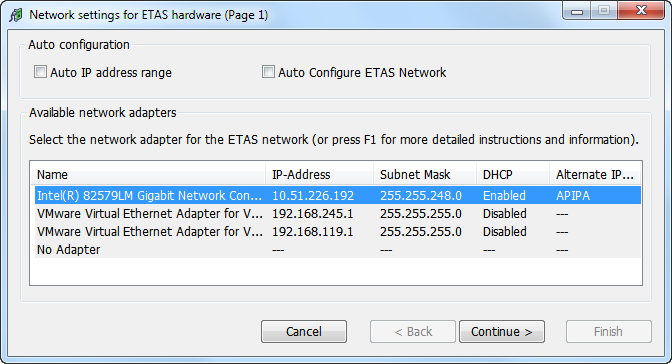
- Open the ETAS Network Manager (e.g. by selecting Utilities - ETAS Network Settings in the INCA Database Manager).
Make sure that the correct network adapter is used:
If the option Auto Configure ETAS Network is unchecked:
Mark the network adapter which is used as Ethernet card for your ETAS network, then click Continue to move on with the IP assignment.Note
If you do not find the network adapter in the list, contact your IT administrator.
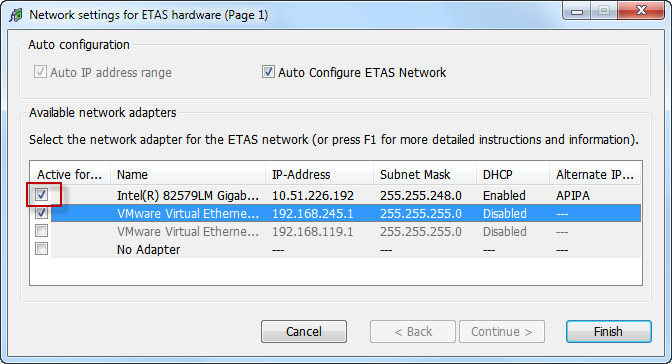
If the option Auto Configure ETAS Network is checked:
Make sure that in the list of network adapters, a checkmark is shown in the corresponding row (other adapters may be additionally marked; which row is highlighted is not relevant), then click Finish. All checked network adapters will be considered by the IP Manager.
Note
It may happen that you can not select the desired network adapter. In this case the configuration of the network adapter is inappropriate. For details on the network adapter addressing, see the help of the Network Manager and/or request help from your administrator.
Check the network card:
It is possible that the device driver of the network card is not running. In this case, deactivate and reactivate the network card again:
 Show details
- To deactivate the network card, in the Windows Control Panel select the Network and Sharing Center.
- Right click on the used network adapter and select Disable in the context menu.
- In order to reactivate the network adapter, right click on it again and select Enable.
The power management of a laptop can deactivate the network card. In this case, turn off power monitoring on the laptop:
Show details- In the Windows Control Panel, select Device Manager.
- In the tree structure of the entry Network Adapters, right click on the used network adapter and select Properties in the context menu.
- Select the Power Management tab and deactivate the Allow the computer to turn off this device to save power option.
- Select the Advanced tab. If the property Autosense is included, deactivate it also.
- Click OK to apply the settings.
It is possible after a certain period of time without data traffic that the network card automatically interrupts the Ethernet connection. This can be prevented by setting the registry key autodisconnect:
Show details- Open the Registry Editor.
- Select under HKEY_LOCAL_MACHINE\SYSTEM\ControlSet001\Services\lanmanserver\parameters the Registry Key autodisconnect and change its value to 0xffffffff.
Check once again the icon of the IP Manager in the taskbar:
 or
or  : The network configuration is ok, and the IP Manager can access the ETAS network.
 : The network configuration is ok, and the IP Manager can access the ETAS network.
However, a warning persists (e.g. because a hardware was detected with an IP address outside of the IP address range for the ETAS network). When placing the mouse pointer on the icon, a tooltip provides further information.
 : The IP Manager can not access the ETAS network; wait for 2 minutes and check whether the icon changes to show that the ETAS network is available.
Note
If you are using the same network card for both your company network and the ETAS network, it has to switch from DHCP to APIPA, e.g. when you open an experiment or search for hardware. The Windows operating system may need up to 2 minutes for this switching process; in this period, the ETAS network is not available.
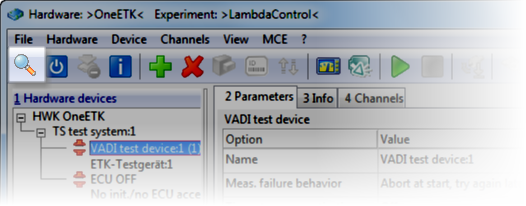
Do another search for hardware (e.g. by opening the Hardware Configuration Editor and clicking in the toolbar).
Is the problem solved?