Editing the Axis Points of a Fixed Characteristic Line/Map
Note |
|---|
This instruction applies only to fixed characteristic lines/maps with maximal 2048 or 63 @ 63 elements. Larger fixed characteristic lines/maps can be edited in the same way as large arrays/matrices; see Editing Data of a Large Array or Matrix. |
- Open the fixed characteristic line or map you want to edit in the table editor.
In the Axis menu of the table editor, select X Supporting Point Setup.
The "X Supporting Point Setup" window opens.
- In the "Offset" field, enter the offset for the first axis point.
In the "Distance" field, enter the distance between the axis points.
Note
Set the values for offset and distance in a way that the result of (Offset/Distance) * gradient
 is an integer number. Otherwise errors will occur when you are working with implementations.
 Click OK.
The values you entered are accepted, and the axis points are adjusted accordingly. The image shows the updated example.
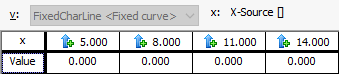
Cancel discards the values and returns to the original state.
- Edit the Y axis points of a fixed characteristic map via the Axis menu, selecting Y Axis Support Points Setup.
- Edit the values of the fixed characteristic line or map.
In a distribution, the Edit Distribution Points option in the Axis menu opens the "Distribution Setup" window. You can use the window as described above, but it changes the values of the distribution, not the index (x axis).
See also
Editing Fixed and Group Characteristic Lines/Maps