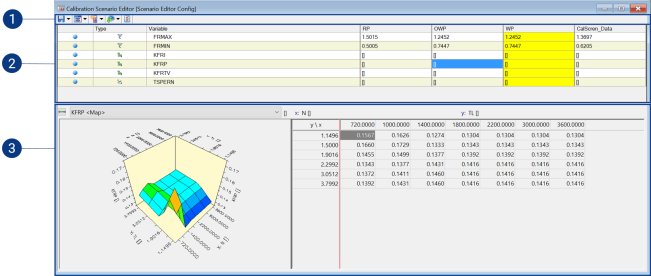
Calibration Scenario Editor Interface
The Calibration Scenario Editor comprises the following components:
 Save Configuration menu
Clicking on the icon saves the current calibration scenario. Clicking on the arrow opens the Save configuration menu.
Save configuration
Save the current calibration scenario configuration to the database items. The data exchange files which contain the values of the individual calibration scenarios are updated.
Save configuration as
Opens the Save as dialog box. Enter here the item name and the storage location for the calibration scenario configuration. A new database item is created under INCA.
 Variables menu
Clicking on the icon opens the variable selection dialog. Clicking on the arrow opens the Variables menu.
Add Variables
Opens the variable selection dialog box. Please select here the variables to be added to the calibration scenario configuration.
Add Variables from LAB File
Opens the Select Lab file to add labels dialog box. Please select there the LAB file which contains the desired combination of variables.
Delete Selected Variables
Removes the selected variables from the calibration scenario configuration.
Delete All Variables
Removes all variables from the calibration scenario configuration.
Save Selected Variables to LAB File
Opens the Save labellist to file dialog box. Enter here the LAB file in which the selected variables are to be stored.
Save All Variables to LAB File
Opens the Save labellist to file dialog box. Enter here the LAB file in which all variables contained in the calibration scenario configuration are to be stored.
Activate/Deactivate Select All Variables
If no variable is selected, all variables are selected with this command. If one or more measured variables is selected, all variables are selected by this command. Once all variables have been selected, the selection is canceled by this command.
Invert Variable Selection
Reverses the variables selection.
About Variable
Opens the About Variable dialog box. In this window additional information on the variables is
displayed.
This command is now available when a variable is selected in a calibration
scenario.
 Scenario menu
Clicking on the icon opens the Add external scenario dialog window. Clicking on the arrow opens the Scenario menu.
New scenario
Creates a new calibration scenario in the current calibration scenario configuration. At the same time, a data exchange file is created in the file system for this calibration scenario.
Add scenario from file
Opens the Add external scenario dialog box. Please select here the data exchange file which contains the calibration scenario to be added to the calibration scenario configuration. Only the variables from the data exchange file which are already being used in the configuration are considered.
Enterprise CDM
These menu functions provide direct access to any enterprise calibration data management system from within INCA.
These menu functions are only available if the eCDM add-on is installed.
Connect to Enterprise CDM Adapter | Establishes a connection to the Enterprise CDM system. To be able to access your Enterprise CDM system via the INCA interface, you need to install a plug-in for the corresponding tool. Please check with your tool provider for the support of the INCA interface. |
Add scenario from eCDM | INCA loads one or more data exchange files from the Enterprise CDM system and uses each of them as a scenario. |
Remove scenario
Removes the marked calibration scenario from the current calibration scenario configuration. The associated data exchange file is not deleted from the file system.
Activate scenario
Activates the marked configuration scenario.
To be able to show the scenario changes in an oscilloscope and facilitate the analysis of the measure data, INCA writes the name of the current scenario to the measure file whenever the scenario is changed. The scenario name is saved in the form of an event comment.
Toggle scenario
Activates the previously active calibration scenario. This makes it possible to toggle between two calibration scenarios - the currently active scenario and the previously active scenario. Only one calibration scenario can be active at a time.
To be able to show the scenario changes in an oscilloscope and facilitate the analysis of the measure data, INCA writes the name of the current scenario to the measure file whenever the scenario is changed. The scenario name is saved in the form of an event comment.
Save scenario
Saves the selected calibration scenario. As a data exchange file is created automatically for each calibration scenario, neither the filename nor the storage location are queried here.
Save scenario as
Opens the Save as dialog box. Enter the desired filename and storage location deviating from the default settings.
Save all scenarios
Saves all calibration scenarios. As a data exchange file is created automatically for each calibration scenario, neither the filename nor the storage location are queried here.
Add all variables from scenario
Adds to the calibration scenario configuration all variables of a calibration scenario incl. the respective values contained in the corresponding data exchange file. Only variables previously not included in the config are added. Existing variables are retained.
Delete all variables from scenario
Deletes all variables from the calibration scenario configuration. The calibration scenarios are preserved. All variables are preserved in the data exchange files.
Rename Scenario
Opens the Rename Scenario dialog box. Enter the new filenames to be assigned to the calibration scenario.
Fill empty cell with Original WP value
Pastes into an empty cell the corresponding value from the original WP scenario.
Delete cell value
Removes the marked variable from the calibration scenario. The variable is preserved in the calibration scenario configuration.
About Variable
Opens the About Variable dialog box.
 Actions menu
Clicking on the icon copies the values from the original working page to the current working page. Clicking on the arrow opens the Actions menu.
Copy original WP to WP
Copies the values from the original working page to the current working page.
Copy WP to original WP
Copies the values from the current working page to the original working page.
Copy RP values to WP
Copies the values from the reference page to the working page.
This window area consists of the following columns:
- Type
An icon denoting the type of variable is displayed in this column. - Variable
The variable name is displayed in this column. - RP Value
The variable values stored on the reference page of the ECU are displayed in this column. These values cannot be changed. - Original WP Value
The variable values of the working page are active when the calibration scenario configuration is called are displayed in this column. - WP Value
The current variable values of the working page are displayed in this column. - Scenario
The variable values of the calibration scenario are displayed in this column.
Additionally, according to the settings made in the Options dialog box, you can display the unit and quality meta data individually for the reference page, working page, original working page and each scenario.
Note |
Quality meta data are supported only if the add-on INCA-QM-BASIC has also been installed. |
In this window area, you can edit the values for each variable.
See also