OBD
This user view is used to query and display OBD-relevant data.
The OBD window provides two different views, one for OBDonCAN (SAE J1979 / ISO 15031-5 on ISO 15765-4) and another one for OBDonUDS (SAE J1979-2 on ISO 15765-4 and on ISO 13400-2) including ZEVonUDS (J1979-3 on ISO 15765-4 and on ISO 13400-2).
Note |
|---|
| Service requests for ZEVonUDS are also covered by the OBDonUDS view because the ZEVonUDS services are a subset of the OBDonUDS services. |
To open the OBD window, click ODX > User Views > OBD. Depending on the selected ODX project for OBDonCAN or OBDonUDS, the OBD window opens in the corresponding view.
The global settings that you can make on the bottom of the OBD window are the same for both views.
Global Settings
Snapshot relevant
Activate this option if you want information from this user view to be included in the snapshot. A separate section is created in the snapshot file for every tab.
Write Configuration to Snapshot
Activate this option if you also want the relevant configuration settings to be included in the snapshot.
Activate this option if you want the Read All function to be executed before a snapshot. This ensures that the snapshot contains up-to-date ECU data.
The "Read All" Buttonand data selection
If all OBD data is to be read at the same time, click Read All at the bottom edge of the "OBD" window. Next to the Read All button, you can select for which tabs you want to perform the query. All selected data for PIDs, OBD-MIDs, monitors, vehicle information data, DTCs etc. that are supported by the connected ECUs are then read automatically according to the current configuration settings in each tab.
As it can take some time to read all OBD data – depending on the quantity of supported data and the number of supported ECUs – progress is shown in a separate window.
Saved Settings
All global settings and also all settings that you can make in the tabs of the OBD window are saved as part of the Experiment configuration.
Displaying the Results
The results of the service request are shown in the individual tabs in the form of tables.
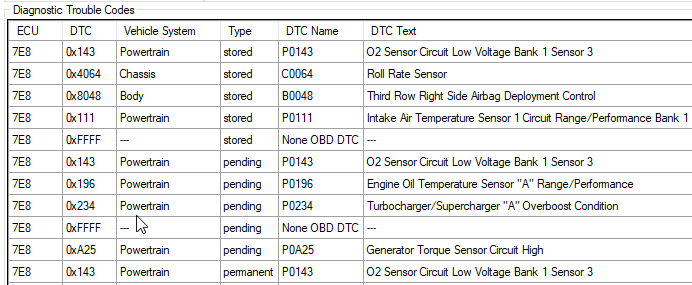
The individual columns of this table can be moved by Drag&Drop – the lines can also be sorted in ascending or descending order of entries by clicking a column heading (in the above figure, sorting takes place in ascending order in accordance with the content of the "DTC" column).
For information on the detailed description of the individual user views, see the following sections:
For more general information on user views, see also the sections